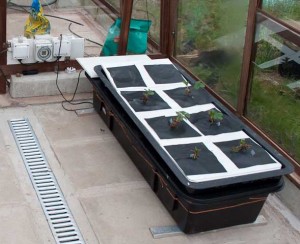
My second winter hydroponic setup showing my ebb and flood Pak Choi system.
This is just a little up date to show you what I’m currently doing in the greenhouse.
With it being winter I don’t usually grow too much due to the costs of heating, This year though I decided to try and grow some plants which are hardy enough to grow over winter.
Specifically winter lettuces/pak choi/various herbs and water cress.
As you can probably see from the photo’s in this post, I’ve bubble wrapped the whole of the inside of one part of my greenhouse.
This helps to keeps the temperature within the greenhouse a degree or two higher than outside.
I do have a heater ready and set to come on if the temperature within the greenhouse does go below freezing but this so far has only come on during two days of cold weather.
To grow these plants over winter in the UK I’ve converted my two large NFT channels into simple flood and drain systems.
I’ve got two fairly small nutrient heaters turned on to keep the nutrient solution from freezing and to keep it slightly warm, This nutrient solution flows down the channels underneath the trays of plants.

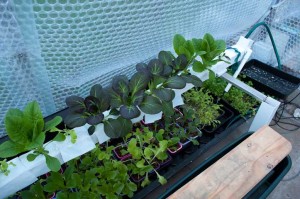
A closeup of the watercress I’m growing with the continously flowing nutrient solution.
This might help keep the plants slightly warm but the main reason for the solution to flow all the time is to trickle over the watercress you can see in the photo growing at the start of each channel.
The continously flow is required to keep the water cress growing happily, I wasn’t sure if watercress would be happy growing during winter due to the low temperatures but the plants seem to thrive.

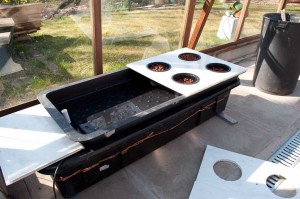
My winter watercress/herbs and leafy lettuce ebb and flood setup
In one of my channels I’ve got lot’s of trays of various leafy lettuce and herb plants all growing in a mixture of vermiculite and perlite.
To ensure the plants all are kept with enough nutrients to grow I’ve inserted a piece of polystyrene into the end the channels,
I’ve done this so the flow of the channels trickles out at the end, but allows me to use a secondary more powerful pump at certain times during the week to flood the channels.
The power of this extra pump is enough to overcome the amount that trickles out through the polystyrene, but when the pump is turned off to stop the flood of nutrient it drains out through the polystyrene quite quickly ensuring the trays of plants don’t get waterlogged.
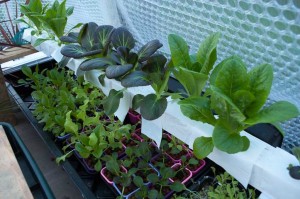
My Pak Choi and Winter lettuce growing in my Ebb and Flood trial system over the top of my flooding converted NFT tank growing more plants and watercress.
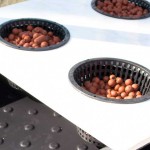
In my second channel I am growing lot’s of individual winter lettuces, and Pak Choi Each one has been propagated in a small rockwool cube then placed in a small pot filled with perlite. As you can see from the photo’s I’ve also topped each pot with several clay pebbles to try and stop algae growth from occuring.
Again I am using the flow of water to grow water cress at the beginning of the channel and also flooding regurlarely using the same secondary pump method as the other channel.
One last thing I’m testing this winter is a small trial flood and drain clay pebble setup growing winter lettuces and pak choi, You can see this setup in the photo’s.
It’s the small white square piece of white guttering pipe which is located above the second channel.
The whole pipe is filled with clay pebbles and has had pak choi and lettuces grown in rockwool cubes placed into cuttings at the top. The whole piece of guttering is flooded every day with nutrient solution.
You might be able to see the difference in growth rate between those grown in this flooding system and the ones grown below it. It’s quite an improvement.
I will probably enlarge this system next winter so I can grow more this way over winter.
I have also started building a system based on this guttering arrangement outside on a south facing wall to carry on growing further lettuces and then switching to growing my strawberry plants outside this year, I’ll detail this new system shortly.