This post is all about my latest way of growing strawberries within a wall mounted stacked vertical hydroponic growing system.
If you have read some of my posts from last year you will see that I tried growing strawberries using various methods and systems inside my greenhouse last year.
The main problem I had with growing them inside the greenhouse was that the plants would get too much intense heat from the sun during the main summer time, To avoid this I made a strawberry growing system which I could have outside. As I had a spare south facing wall this seemed an ideal place to place the system.
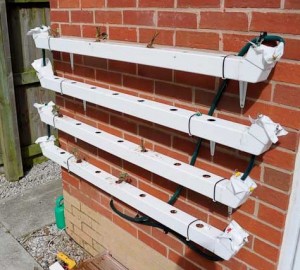
The four channels of my vertical ebb and flood strawberry system
The system currently consists of 4 channels which are hung from brackets on the brickwork, The channels are all made from standard upvc square downpipe from the local DIY store.
Rather than making an NFT system which simply had 4 channels with water continuously flowing through each one I decided to make my life more tricky by creating an ebb and flood system, sometimes called a flood and drain system.
Basically the method these designs work on is that within the tank or channel where the plants are grown is some form of growing media, In my case clay pebbles. Every so often the channel is flooded with nutrients. This allows whichever media is in use to take on that water and nutrients. The channel is then slowly drained which allows oxygen to be taken in when the water is drained. The roots of a plant are placed within this media so that they can use this oxygen rich nutrient supply from the media continuously. The only thing that needs to happen is that the flooding takes place often enough that the plants roots never become dry because the media holds no more moisture.
Creating a flooding and draining system like this is no easy feat and as the channels are only 2 inches square and required some thinking about. The problem was that I only wanted to use one supply so pumping into all 4 at once wasn’t an option. If I did use this method most of the nutrient supply would go the easiest way which would be the bottom channel.
The design I came up with is the one shown in the diagram below.

Verticle Strawberry Ebb and Flood Growing System
The nutrient supply is pumped into the very top channel. This channel which is full of clay pebbles is then slowly filled.
At the opposite end of the channel I have a small section of hosepipe which runs from this channel into the next one down. The height of the hose pipe in the top channel is placed at such a height to work as an overflow so that the nutrient level within the channel will at most be full but never overflowing. This allows the flooding process to occur.
The hosepipe also has a small hole near the bottom of the channel to allow it to slowly drain, As the pumping speed is a lot faster than it can drain it only drains properly when the pumping has stopped.
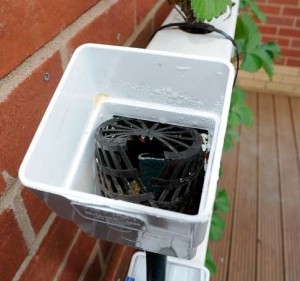
Mesh pot covering channel ends.
Over this end of the hosepipe piece I’ve placed a small mesh pot to stop any clay pebbles from getting near to the hosepipe as they will block it and stop the system from draining properly.
I used the same design of channel repeated 4 times to create the system, This means that when the first channel is filled with the pumped nutrient solution it overflows down into the second channel, Which then fills up overflowing into the third channel which then obviously does the same into the last channel. This last channel is then drained back to the nutrient tank until its next flooding cycle.
 Each end of down pipe has been capped with a small piece of corex cut to the correct size and folded over to make a nice seal. This makes the overall system design look quite pleasant. Which as my wife says is quite unusual for me, she says my systems usually just look like they are cobbled together with all sorts of stuff.
I’ve used the system to plant strawberries in and will hopefully be leaving them until they have finished producing in a few years time all going well.
As you can see from the photos I cut 7 round holes in the top of each channel to allow me to place 7 plants in each, Each runner was pushed into the clay pebbles after running the system a few times to ensure the clay pebbles to be moist enough.
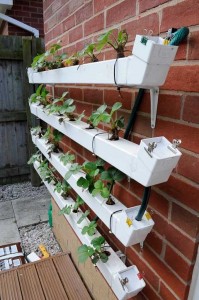
Strawberry plants in the system after 1 week.

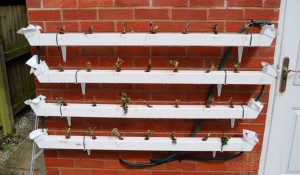
Strawberry plants in the system after 3 weeks.
 I also though it would be best if I added a net to the system to try and stop birds from eating my precious strawberries, If the netting was simple draped over the plants birds could poke their beaks through and steal my strawberries so I made a frame over the system with some flexible pipe I had from my other systems and then draped the netting over this.
The photo on the right shows what this looks like.
I just have to wait now for all the lovely strawberries to come.
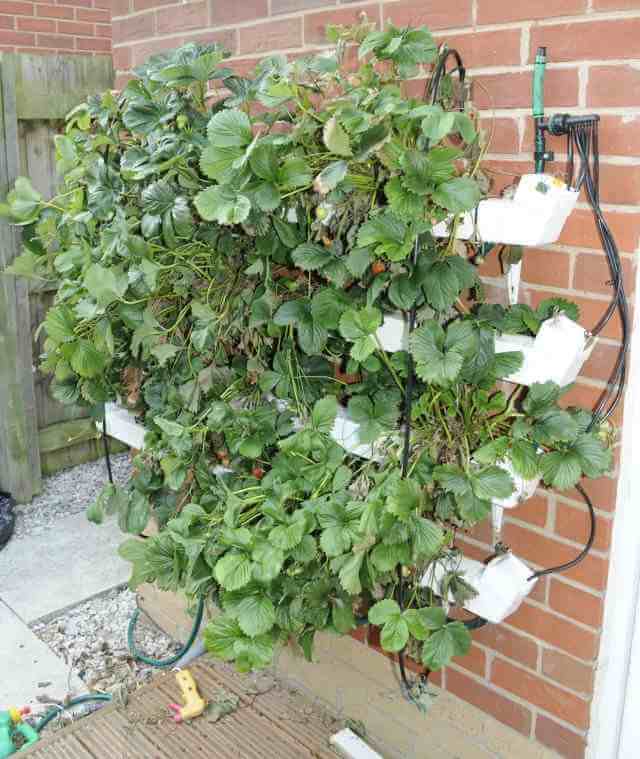
As an update to my post, The picture below is what the system looks like now in the middle of July 2015, As you can see it’s growing very nicely and I’m harvesting lot’s of strawberries every day at the moment. Just before I took the photo I’d harvested all the fruits that is why it just looks green at the moment.