I always seem to have a few problems propagating my plants from seed so I thought I would design something especially for the way I grow things. One of the things I always have a problem with when propagating plants is forgetting to water the seedlings when they have grown so I wanted to design something which was capable of watering my plants automatically.
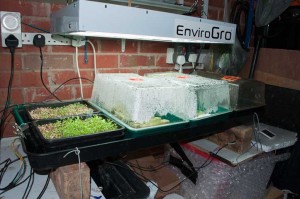
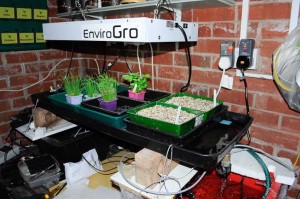
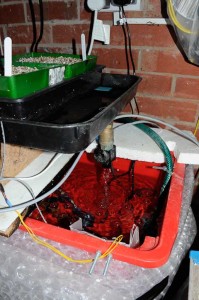
The photos here show what I designed for my needs, the basic setup is a grow bag tray which rests on two containers. One of the containers is used to house a very week nutrient solution. It’s very weak so that it doesn’t give to much nutrient to seeds which have enough nutrients within them already to start to propagate, Yet has enough nutrients to provide the requirements for young seedlings or plants so that I don’t have remove them from the system very early.The nutrient solution is heated with an aquarium heater and then pumped continuously into the end of the grow bag tray, It then flows down the grow bag tray which is slightly sloped and then returns back to the nutrient tank through a small outlet. The seed trays or rockwool cubes I use in the system are all raised slightly off the base of the tray so that the nutrient solution flows underneath the trays normally, this means the trays don’t get waterlogged yet have the heat rising through the trays from the nutrient to warm them.
The clever thing about the nutrient outlet is that it has a small motorised valve attached to it, This valve is automatically closed every day or so for about 5 minutes.
This stops the nutrient solution returning to the tank allowing the nutrient solution to pool in the grow bag tray, This rising nutrient solution is used to water any plants or seedling growing in the system from underneath. You can see from the photo’s how the trays sit in nutrient tray, watering the seedlings from underneath stops any damage from occurring to the tiny leaves.
The opening and closing the motorised valve is done by a small device I purchased called a PoKeys57E, This is from a company called PoLabs and allows me to connect lot’s of different things to the device which can then be interrogated by my home PC. I wanted to know what the temperature was in the propagator and also when the nutrient level is going low in the nutrient tank.
It was a simple matter of connecting these to this device and then running a network cable to my PC to allow me to monitor what was happening. The PoKeys device also allows you to connect a display fairly easily which I have done so I can see a local reading of the current temperature. I now have two of these devices at home, one for my propagator and one in the greenhouse to monitor nutrient tank levels and flow rates.Since I started growing and propagating within the system at the start of the year, I’ve successfully grown lot’s and lot’s of lettuces, Herbs, Peppers, Tomatoes, Cucumbers and every other seed I’ve wanted to propagate.
I also use the system to get my watercress growing ready to be transplanted into my solar powered watercress growing system, a side effect of having the nutrient solution flowing all the time is that it is ideal for growing seedlings which like flowing water like watercress.

To grow herbs and lettuces I’ve used trays full of a mix of perlite and vermiculite which have the seeds sprinkled on the top and then a tiny coating of more vermiculite on the top, for other plants which I’m going to transfer into my greenhouse or outside hydroponic systems I used 1.5 inch rockwool cubes which are then transplanted into 3 inch rockwool cubes when the roots emerge.
As the propagator is contained within my garage the system there is no light available to the plants, to allow the seeds and plants to successfully grow I added a EnviroGro LightWave T5 grow light which features 4 fluorescent tubes and is quite low cost. It’s an ideal size to use over the tray and covers pretty much all the plants completely. Being fairly cool in use allows me to lower the light to be very close to the seeds.
The T5 Light does generate a slight amount of heat so I use this in a beneficial way by having the light on during the night rather than the day. The extra temperature during this cold period helps keep the plants warm when it’s most required.
As the garage has no windows it seems to have a very stable ambient temperature which allows the propagator to function well regardless of the outside temperature, So it should work just as good during the summer as it does in winter. And automatic water means if I forget about it for a day or two I know the seedlings are quite happy.


